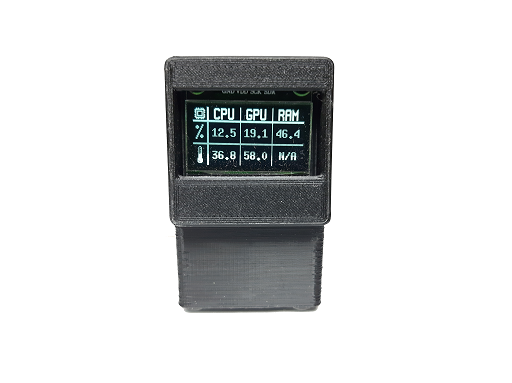
There are many software solutions available already, but the screen space a hardware monitor takes up is annoying to me. That's why I decided to make an external one.
This device uses Open Hardware Monitor as a base. A program running on my desktop will measure the load and temperature of my CPU, GPU and Ram. This is then sent to an Arduino, where the data is sent to a display, where it doesn't take up screen space on my monitor.
You'll need a few pieces of hardware to get started:
- An arduino pro micro
- An SSD1306 128X64 display
- A micro USB cable
- Soldering supplies
- An SSD1306 128X64 display
- A micro USB cable
- Soldering supplies
You'll need a to connect the components of the hardware monitor according to this schematic.

To use Open Hardware Monitor in a project, you need to download it from here. Unzip the downloaded file in a folder of choice.
Now there are 2 programs we need to write ourselves. One to run on the PC and the other to run on the Arduino. We're going to write the program for the Arduino first.
				#include
#include
#include "hwmbg.h"

#ifdef U8X8_HAVE_HW_SPI
#include
#endif
#ifdef U8X8_HAVE_HW_I2C
#include
#endif
First, we're going to include a few libraries. "U8g2lib" is a universal display library, "hwmbg.h" is a custom library that contains the image file for the background, "SPI.h" is an SPI library and "Wire.h" is an I2C library Make sure to have all of these libraries installed. You can find them in the library manager through the Arduino IDE. Only hwmbg.h has to be installed manually. Just place the file in the project folder.
/*
 * 128x64 SSD1306 OLED
 *
 * PIN CONNECTIONS:
 *
 * VCC    3.3V
 * GND    GND
 * SCL    PIN 3
 * SDA    PIN 2
 *
 */
These comments describe what physical connections are made and what pins are used for the display. It's always useful to have those nearby.
U8G2_SSD1306_128X64_NONAME_1_HW_I2C u8g2(U8G2_R0, /* reset=*/ U8X8_PIN_NONE); //Define what screen is used

void setup() {
  // put your setup code here, to run once:
  Serial.begin(9600);     // opens serial port, sets data rate to 9600 bps
  u8g2.begin();
  u8g2.setFont(u8g2_font_7x13B_tn);
}
In the setup, there are 2 things that have to be done: start the display and start the USB connection.
void loop()
{
  // put your main code here, to run repeatedly:
  String results[5];
  String message;
  bool messageDecoded;
  int j = 0;
  int k = 0;
  static unsigned long x = 0;
  static byte i=0;

if (Serial.available() > 0)
{
  message = Serial.readString();;
  j = 0;
  k = 0;
  messageDecoded = false;

if (messageDecoded == false)
 {
  while (k < message.length())
  {
      if(message.charAt(k) == '|')
      {
        j++;
        k++;
      }
      else
      {
        results[j] = results[j] + message.charAt(k);
        k++;
   }

    messageDecoded = true;
 }
  //ROUND ALL NUMBERS HERE
  for (int l = 0; l < 5; l++)
  {
    if (results[l].indexOf('.') != -1)
    {
      if (results[l].length() > results[l].indexOf('.') + 1)
      {
        results[l].remove(results[l].indexOf('.') + 2);
      }
    }
    else
    {
      results[l] = results[l] + ".0";
    }
  }
The loop follows this order: First, check if there is data coming from the USB port. If there is, read it and round all the numbers.
  // picture loop
   u8g2.firstPage();
   do {
     u8g2.drawXBMP(0, 0, 128, 64, logo); //Set cursor -> write text after drawXBMP -> you write over the BMP
     u8g2.setCursor(22,32);
     u8g2.print(results[0]);
     u8g2.setCursor(22,57);
     u8g2.print(results[1]);
     u8g2.setCursor(59,32);
     u8g2.print(results[2]);
     u8g2.setCursor(59,57);
     u8g2.print(results[3]);
     u8g2.setCursor(96,32);
     u8g2.print(results[4]);

   } while( u8g2.nextPage() );
  }

 }
}
From there, the data will be sent to the display, where it will be shown, along with the background, which was stored in the hwmbg.h library.
With the Arduino code now done, it's time to make the code that runs on your desktop. This will be written in C#, using Visual Studio. There is some setup to be done before we write any code. It's important that you open Visual Studio with admin permissions, by right clicking on the icon in your start menu and selecting "run as administrator"
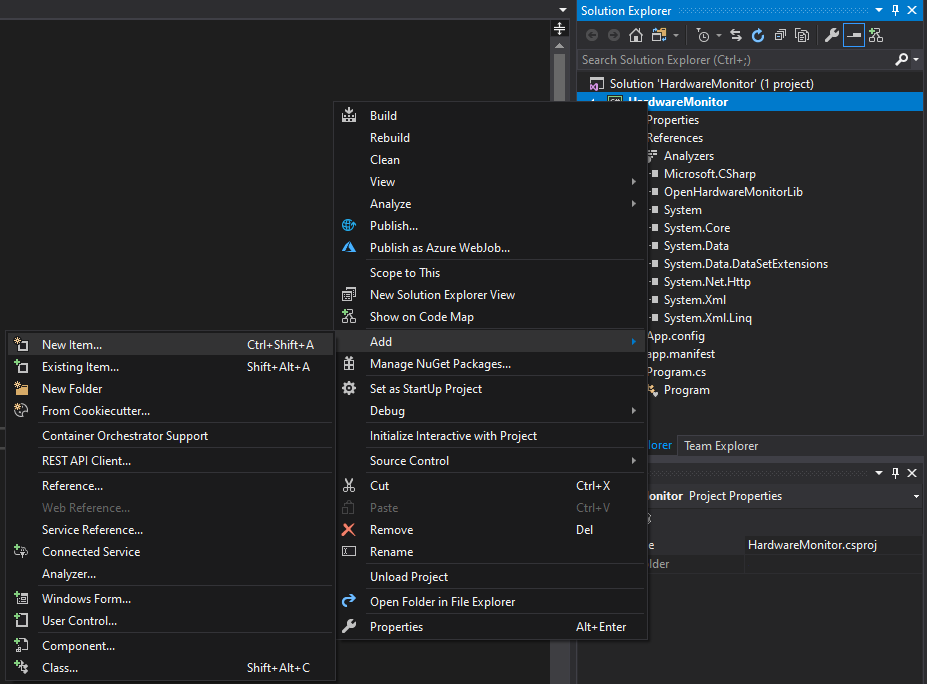
The first thing we need to do now is make an app.manifest. To do this, right click your solution, click "add" and select "new item". From there, search for "Application Manifest File" under the Visual C# menu

In the App.manifest file, you need to go to line 19 and change it from
<requestedExecutionLevel level="asInvoker" uiAccess="false" />
to
<requestedExecutionLevel level="requireAdministrator" uiAccess="false" />
This will ensure that your program will launch with administrator permissions, which is needed to read the status of computer components
Now, you'll need to navigate to the folder that you installed Open Hardware Monitor in. In this folder, you'll find a file named OpenHardwareMonitorLib.dll. Copy this file to your the folder that contains your Visual Studio Project.
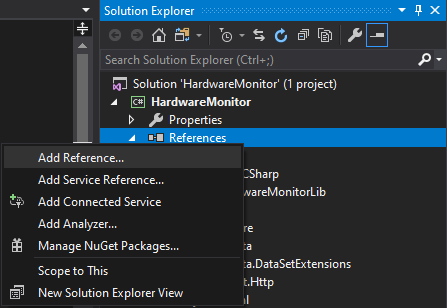
We'll need to make a reference to this file. In Visual studio, right click "References" and select "add reference". Press the "browse" button and go to the file you just copied into your project folder. Click "Ok" to finish setting up the reference.

Now it's time to write the code that measures the data we want and sends it to the Arduino.
					using System;
using System.Collections.Generic;
using System.Linq;
using System.Text;
using System.Threading;
using OpenHardwareMonitor.Hardware;
using System.IO.Ports;
First, we use a few namespaces and libraries. The most important ones here are the Open Hardware Monitor library, which enables our code to read stats about our components and the other important library here is System.IO.ports, which enables us to send data over USB
namespace HardwareMonitor
{
    class Program
    {
        public static SerialPort port = new SerialPort("COM11", 9600, Parity.None, 8, StopBits.One);
        public static string cpuLoad;
        public static string cpuTemp;
        public static string gpuLoad;
        public static string gpuTemp;
        public static string ramLoad;
        public static string message;
        public class UpdateVisitor : IVisitor
        {
            public void VisitComputer(IComputer computer)
            {
                computer.Traverse(this);
            }
            public void VisitHardware(IHardware hardware)
            {
                hardware.Update();
                foreach (IHardware subHardware in hardware.SubHardware) subHardware.Accept(this);
            }
            public void VisitSensor(ISensor sensor) { }
            public void VisitParameter(IParameter parameter) { }
        }
Right before the initialization of our variables, we select a USB port. As you can see, I use COM11. Make sure to change this port to the port your Arduino is connected to. Otherwise, your code won't run.
The next functions are used to "visit" the components of the computer and see what their status readings are.
        static void GetSystemInfo()
        {

        UpdateVisitor updateVisitor = new UpdateVisitor();
            Computer computer = new Computer();
            computer.Open();
            computer.CPUEnabled = true;
            computer.GPUEnabled = true;
            computer.RAMEnabled = true;
            computer.Accept(updateVisitor);
            for (int i = 0; i < computer.Hardware.Length; i++)
            {
                if (computer.Hardware[i].HardwareType == HardwareType.CPU)
                {
                    for (int j = 0; j < computer.Hardware[i].Sensors.Length; j++)
                    {
                        if (computer.Hardware[i].Sensors[j].SensorType == SensorType.Load)
                        {
                            cpuLoad = computer.Hardware[i].Sensors[j].Value.ToString();
                        }
                        else if (computer.Hardware[i].Sensors[j].SensorType == SensorType.Temperature)
                        {
                            cpuTemp = computer.Hardware[i].Sensors[j].Value.ToString();
                        }
                    }
                }
                else if (computer.Hardware[i].HardwareType == HardwareType.GpuNvidia)
                {
                    for (int j = 0; j < computer.Hardware[i].Sensors.Length; j++)
                    {
                        if (computer.Hardware[i].Sensors[j].SensorType == SensorType.Load)
                        {
                            gpuLoad = computer.Hardware[i].Sensors[j].Value.ToString();
                        }
                        else if (computer.Hardware[i].Sensors[j].SensorType == SensorType.Temperature)
                        {
                            gpuTemp = computer.Hardware[i].Sensors[j].Value.ToString();
                        }
                    }
                }
                else if (computer.Hardware[i].HardwareType == HardwareType.RAM)
                {
                    for (int j = 0; j < computer.Hardware[i].Sensors.Length; j++)
                    {
                        if (computer.Hardware[i].Sensors[j].SensorType == SensorType.Load)
                        {
                            ramLoad = computer.Hardware[i].Sensors[j].Value.ToString();
                        }
                    }
                }
            }
            computer.Close();
        }
This is the function where the magic happens. The first loop loops through all hardware components in the computer and checks if it can find a CPU, a GPU and the RAM. When it finds one of these three, it loops through the sensors that this component has and stores the values we're looking for.
        static void SendSystemInfo()
        {
            message = cpuLoad + "|" + cpuTemp + "|" + gpuLoad + "|" + gpuTemp + "|" + ramLoad;
            port.Write(message);
        }
The gathered info is now compiled into a single message. Every value is seperated by a "|". This is used in the arduino code to find where a value stops and where a new one starts. This message is then sent to the Arduino with the USB port that's been chosen earlier.
        static void SetupConnection()
        {
            port.Open();
        }

        static void Main(string[] args)
        {
            SetupConnection();
            while (true)
            {
                GetSystemInfo();
                SendSystemInfo();
                Thread.Sleep(2000);
            }
        }
    }
}